I always look forward to looking through scrapbooking books for new ideas.
It is so easy to pique your creativity by looking at other people's page layouts.
I have read a lot of books and almost all of them will leave you with at least one idea that you can't wait to try on your next page layout, but my all time favourites are the Creating Keepsakes books.
The books are a collection of the best layouts from the Creating Keepsakes magazine and are full of inspiring ideas.
Everytime I get a new one, I go through a whole pad of paper making bookmarks for all of the great tips and techniques on every page.
My favourites so far are Scrapbook Tips and Techniques and Award-Winning Scrapbook Pages.
Check them out, you'll love them.
Thursday, March 23, 2006
Wednesday, March 22, 2006
Scrapbook Themes
There are so many things going on in your life that could easily become a scrapbook.
Everyone has seen the traditional scrapbooks. Pages of photos, colourful papers, and beautiful embellishments. Why not try to expand your horizons. Scrapbook everything in your life, your mind, and your heart.
I recently read a few pages from an expectant mother who scrapbooked the changes and excitement of pregnancy. She hardly used any pictures, just journaling, a few images, and embellishments, and that was it.
While it was relatively simple, what a keepsake it would be for her child.
Most of my scrapbooks are daily life events: hikes, trips, friends, nature, etc. Things that I take pictures of to remember.
Why not leave your pictures for a while and explore other areas of scrapbooking?
Scrapbook your goals, your hopes, or make a scrapbook with a message to give to someone else.
These scrapbooks don't have to be 12 x 12, why not use up some of those tags that you have lying around and make a tiny tag book?
This doesn't have to be a project that you show everyone, as they come through the door. Not all scrapbooks have to be on display for everyone to see.
Scrapbooking can be therapeutic, so why not create an album that allows you a chance for release?
There are many ways to capture a moment, a memory, or even a feeling. Why not do your best to treasure everything about yourself, the good, the bad, and the photogenic?
Digital Scrapbooking
While some people love the sensory experiences involved in creating a scrapbook, some bypass the clutter and embrace the simplicity of digital scrapbooking.
There are a number of websites that sell digital embellishments, papers, fonts, and anything else you may need to create the perfect layout.
The process is similar to traditional scrapbooking in that you pick a background paper and build up with any embellishments you wish to add.
Here are a few sites that seel digital scrapping materials:
http://www.twopeasinabucket.com/digitalKits.asp
http://www.twopeasinabucket.com/shopFonts.asp
http://www.macscrapbook.com/indexgoogle.html
While there are many programs specifically designed for scrapbooking, many page layout programs have similar capabilities. Check out the programs you have on your computer before you invest a lot of money in software.
If you decide to make an investment, make sure you look around before you purchase.
One of the best sites for digital scrapbooking beginners is http://www.digitalscrapbookplace.com/
They have great freebies to give away, as well as tutorials, tips, and reviews.
Check them out before you go anywhere else for your digital needs.
Digital scrapping is a great way to keep yourself organized and once you get the hang of it, it's faster than traditional scrapbooking.
If you still like the look of layered scrapbook pages, you can start slow, and add a few digital elements to your page to create a mix between digital and traditional methods.
The thing to rememeber is that there are no rules.
Make sure that you're still enjoying yourself, whichever method you favour. This is still your hobby so make it fun.
Tuesday, March 21, 2006
Scrapbook Kaleidoscopes
Scrapbook Kaleidoscopes are a great way to add interest and creativity to a page layout.
Such a unique look can be completed using any picture with a single, predominant subject.
It can either be created as the focal point of the page, or as a beautiful, intricate embellishment.
It's easiest to get a pattern for photo kaleidoscopes, before you begin, to learn proper placement.
Depending on the look you want, you will have to determine how many 'spokes' you want on your kaleidoscope wheel. This will in turn, determine how many copies of the picture you need to make.
Another thing to keep in mind are the edges that you cut. You must be very precise to ensure that the photos line up, without gaps.
There is a simple solution, if you're willing to wait a while for your kaleidoscope.
If you visit http://www.lotusflowerimaging.com/kaleidoscopes.htm
and send them your pictures, they will make the kaleidoscope for you, complete with special effects.
There is also software that you can purchase for your computer that will complete the kaleidoscope for you. This way, you can easily make small embellishments, without all the time and effort. Visit http://www.scrampingcentral.com/product-review/july2005-Kreative%20Kaleidoscopes/kreative-kaleidoscopes-scrapooking.html for more details.
Saturday, March 18, 2006
Tip # 22
I love ribbons.
They are my favourite new toy to play with when designing my scrapbook pages.
Got a blank spot?
Attach a ribbon with a brad or a staple.
Need a border quick?
Glue a ribbon down flat across one side of your page.
They're so easy to use and are often exactly what the page was lacking.
My favourite new tip is to use your printer to print words on your ribbon.
Personalized ribbons. What a great idea, right?
The best part is that it's SIMPLE.
Step 1: Simply type whatever you'd like to appear on your ribbon in a basic Word, Works, or Appleworks program and save it. Keep in mind the width and colour of your ribbon while you're typing.
Step 2: Print the file and make sure the words will fit nicely on your ribbon.
Step 3: Tape your ribbon directly over the printed words, with the side of the ribbon you'd like embellished facing up. Make sure that you place the tape only on the sides of the ribbon, so that it doesn't get in the way of the printing process.
Step 4: Hit print again, running the same piece of paper through the printer, and voila, your own, personalized scrapbook embellishment.
Friday, March 17, 2006
Cardstock 101
Cardstock is a staple to most scrapbookers.
A heavy-weight paper that can be used to mat photos or create embellishments, cardstock is perfect for those jobs that need to be sturdy.
Most often used in card-making, because of it's strength, cardtsock is a terrific medium to work with.
It is easy to bend, fold, curl, or cut cardstock without worrying about tearing or damaging the paper.
Simply tearing cardstock is an excellent way to showcase the strength and versatility of this paper.
Tearing cardstock is also a great framing technique as torn cardstock is the same colour, top and bottom, and will not leave you with a white edge, as patterned paper will.
These exposed raw edges can be chalked or antiquated, using distressed ink to accentuate the roughness and dimension.
Cardstock is also a perfect medium for stamping, painting, or embossing, as the density of the paper stops warping.
These are simple and fun ways to make your own patterns on plain cardstock.
Cardstock can be bought in a variety of sizes, but only comes in solid colours, there are no patterns available.
While there are no patterns available in cardstock weight paper, there are a wide variety of colours. Finding a cardstock colour to coordinate with any patterned paper you may be using is quite easy.
The combination of heavy and light weight paper make the finished layout a thing of beauty.
Thursday, March 16, 2006
Adding Texture With Acrylic Paint
I'm a big fan of dimension.
If page layouts are layered, they look so much fuller.
Somehow, the layers make the pages pop.
Acrylic paint is a great way to add dimension to your pages without taking up your precious time and money.
Some simple tips:
• A simple swipe across a page with a foam brush provides you with a great spot for journaling.
• Use acrylic paint and foam stamps to make your background more interesting (you ccan even stamp right over top of your pictures, they're safe).
• Paint freehand on backgrounds, embellishments, or photo mats to create a more unique design.
However you decide to apply acrylic paint, the finished product will be sure to impress.
Acrylic paint can be found at craft stores, scrapbooking stores, and even sometimes dollar stores. It costs as little as $0.99 and will last for years, if properly stored.
The best part is that once you have some you'll be so impressed you'll want to use it in all of your crafts.
Happy painting!
Wednesday, March 15, 2006
Get Creative With Photo Corners
Scrapbooking has long since evolved above and beyond the days of adhering photos to black paper with black photo corners and a few words written in gold or silver gel pens.
There are so many new options in the world of scrapbooking, that page layouts are fast evolving into an artform.
The more creative the better.
So why would I suggest a return to photo corners??
Well, like scrapbooking, photo corners have come along way.
You can now buy different colours of the classic photo corners, as well as corner stickers with all kinds of designs and textures to use in place of the classic, somewhat dated, black photo corners.
Not only are there lots of options on the market, there are plenty of ways to make your own unique corner embellishments.
• cut some of your own paper into even triangles to use as corners (extra tip: tearing the longest edge of the triangle gives a little extra dimension to your corners)
• embellish corners with die-cut shapes or punches
• stamp directly onto the corners of your photos (extra tip: add embossing powder for a really dramatic look)
• embellish those basic black photo corners you have on hand with stamps, punches, gel pens, or embossing ink
• use the corners to do one word journaling (use gel pens or computer software to do the writing)
• use brads, buttons, or eyelets as photo corners
The possibilities really are endless. Why not explore a few options and see how you can add colour and dimension to your scrapbook pages by simply expanding upon an old favourite?
Note: If you click on this article's title, you will be taken to an Adobe document that explains how to create digital photo corners. This allows you to design photo corners that will perfectly match your page layout, be it digital or otherwise.
Monday, March 13, 2006
The Wonders of Distressing Ink
Distressing ink is a wonderful tool to add character and depth to your page layouts.
Great for old time photos or collage pages, this technique accentuates layered pages, giving your layouts a much more dimensional appearance, with hardly any work.
The new distressing inks are so easy to use, you don't even need an applicator. Simply turn the ink pad upside down and blot it on any element you choose.
Use it on:
• the edges of pages
• each different layer of a tag or embellishment
• edges of photos
• your entire layout for an all over antique look
If you're looking for a stronger technique than just blotting, try incorporating other elements.
• stamp designs onto your background or directly onto your photos
• ink over a strip of mesh, then peal off for a unique grid design
• crumple a pice of paper into a ball (careful not to rip it) and then roll the ball over the ink pad pressing gently (the finished, uncrumpled product will have jagged ink lines crisscrossing it's surface).
If any one of these method appeals to you, make sure you encorporate this great tool into your scrapbooking repertoire. You'll love what distressing ink can do for your layouts.
Sunday, March 12, 2006
Fun With Beads
The greatest thing about beads is that you can use them on anything.
They go with any layout, and depending on the colours, size, and shape of the beads, they can help you set the perfect mood for your scrapbook page.
Simply string a few beads and attach them to journaling blocks, dangle them from pictures, sew them on a photo mat, or sprinkle them randomly as quick embellishments.
The most important part is proper fastening. Make sure those beads are secure!!
Nobody likes to pick up a scrapbook and have a shower of tiny beads hit their feet.
"No, it's not a big deal, I promise."
Very uncomfortable.
To avoid that, make sure they're firmly fastened with a very durable adhesive, string, or wire, before you hand your scrapbook over to admirers.
A great tip to save money on beads is to raid your drawers before you go shopping.
No, don't unstring your grandmother's pearls, but try to incorporate that bracelet that roke ten years ago that you swore you'd fix.
Why not forget about the hassle (were you really going to fix it anyway?) and add a piece of you to your layouts.
If the forgotten jewelery had some memories attached to it, even better! Add the memories to your journaling. Make a note of how your life has changed since then or where you found it.
Beads are a great way to add dimension, character, and colour to your layouts.
Experiment with a few techniques and let beads be the next embellishment to adorn your scrapbook.
Friday, March 10, 2006
Combining Hobbies
I have to admit, scrapbooking is my main hobby.
I love to scrapbook; could spend all day with photos, papers, scissors, and the rest of my amazing scrapbooking supplies.
I'd spread out all over the kitchen table and spill out onto coffee tables, computer desks, and any flat surface that could be quickly adapted into scrapbooking space.
But, even though my scrapping addiction...er, hobby is one of my favourite past-times, I do have other interests.
Most of my interests are reflected in my photos: baseball, hiking, my puppy, my husband, skiing, friends, family, the list goes on and on.
The best part of scrapbooking is the lack of boundaries.
Why not encorporate all of my hobbies into my layouts? I can add them to any page and fire up my brain's creativity.
Some ideas of hobbies you can incorporate into your scrapbooks are:
• painting - everything from small elements to entire pages can be created with a few artistic brush strokes
• origami - a delicate folded flower or animal is a great embellishment for scrapbooks and if you have paper, you all ready have everything you need
• quilting - from intricate paper pieced projects to quilted flowers or titles, stitching is a great way to add character to a page (it's also a very simple and decorative way to attach elements)
• decoupage - you can use decoupage to attach delicate items like dried flowers or use it as a quick way to add a little extra shine to an element.
• calligraphy - journaling, titles, embellishments, etc.
• interior design - use your hobby for colour or textural inspiration on your layouts
• music - encorporate song lyrics into your journaling
Whatever your hobby, embrace it!
Scrapbooking has no borders, no boundaries, and no rules.
Experiment, create, and enjoy.
Thursday, March 09, 2006
Tip # 46
The best part of scrapbooking is getting together with others.
Scrap-gatherings you could call them.
Take some friends and go to a scrapbooking store with a workshop, have a weekly get-together with friends and neighbours who share your passion, or if you can, start a scrapbooking club in your community.
You would be surprised at how many people will jump at the chance to share memories, stories, and techniques.
Not only is it fun to get together with the girls, it's a great way to gain inspiration and creativity and share your tips and techniques with others.
Scrap Away!
Quick Note: By clicking on the article title, you will be forwarded to a page that describes how to start your own scrapbooking club.
Fun With Heat Embossing
While regular embossing is a great way to add dimension and texture to a page, heat embossing is a little twist that's just plain fun.
You can take a pretty element from your page and make it look professional with a few sprinkles of embossing powder and a blast from a heating element.
Heat embossing can be used with stamps, embossing pens, or just sprinkled randomly to ahieve a great 3-D, liquidy finish.
The best part is that it's easy.
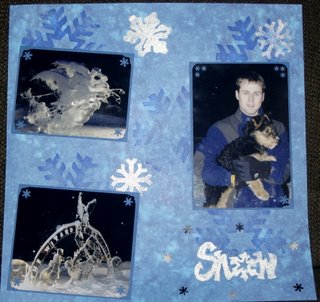
In this layout, the white snowflakes and the title were heat embossed using stamps.
To copy this technique, simply ink your stamp with embossing ink (any inkpad that stays moist and doesn't dry immediately will work), stamp your page, and then dust embossing powder over the image. Shake off any excess powder (it can be reused, so don't toss the remnants), and then heat it with an embossing tool for a few seconds.
Simple, right!?
The best part is if you make mistakes, you can just use an embossing pen to fill in the bare areas and repeat the process all over again (I learned that trick from a fellow scrapbooker and instructor).
If you use the pens to begin with, you can emboss your own designs, or use it to make your handwritten titles pop.
This way you don't have to worry about always having the perfect stamp on hand.
To decorate background pages you can sprinkle embossing powder freehand and then heat it.
Tip: This is definitely the least controllable method. Keep in mind that whatever powder is on the page will melt and become a permanent part of your layout.
This works great to make snowy backgrounds or to create rain or splashes.
Play with the colour of ink you use, as well as the type of embossing powder. There are so many great ways to use heat embossing on your page layouts, accents, greeting cards, bookmarks, etc.
You can create all kinds of 3-D images with these techniques. Like all crafting techniques, play with it until you find the method that works best for you. Explore these and other techniques until you get the exact look you want.
Happy Embossing!!
Wednesday, March 08, 2006
Dry Embossing 101
Dry embossing is a great way to add texture and dimension to your scrapbooks.
Frame photos, make an instant border, or use individually embossed elements as embellishments to add charisma to your pages.
However you choose to use the technique, the outcome is fantastic.
To step up your basic embossing, try to make each page your own by adding a little extra to your embossed images.
My favourite 'extras' are sanding and chalking.
These techniques are fast, easy, and inexpensive, but they take a so-so layout and make it perfect.
Sanding is quite simple. All you need is an embossed image and a small piece of fine grade sand paper.
Lightly rub the sand paper over the embossed image, being careful not to tear the paper. This will give the image a rough, grainy look and a nice, white outline.
Tip: If you are using cardstock, you won't see white, but the edges will still look rough and texturized.
To chalk the images, simply rub chalk onto the raised part of the image with an applicator (a cotton swab or a makeup sponge work well) until you've achieved the desired look, and gently shake off extra chalk dust.
Tip: Chalk erasers are a great tool for scrapbookers. Any mistakes you make while chalking can quickly be righted with this handy invention
You decide how you want it to look by choosing the chalk colour and how much you apply. You can trace the inside of the emossed design or you can chalk the whole image.
Tip: Feel free to use different colours on the same design (ie. a flower in a pot: use different colours of chalk to make the flower pink, the stem green, and the pot a terra cotta orange).
In this picture, I chalked the designs with black chalk, shading the whole element in, and then rubbed sandpaper lightly over top, to help the designs stand out.
Both of these techniques call attention to embossed elements which could otherwise go unnoticed.
For more great tips and how-tos, click on the article title. You will be directed to a great dry embossing site with information on how to emboss, what you need to get started, and great ideas to keep your creative juices flowing.
Frame photos, make an instant border, or use individually embossed elements as embellishments to add charisma to your pages.
However you choose to use the technique, the outcome is fantastic.
To step up your basic embossing, try to make each page your own by adding a little extra to your embossed images.
My favourite 'extras' are sanding and chalking.
These techniques are fast, easy, and inexpensive, but they take a so-so layout and make it perfect.
Sanding is quite simple. All you need is an embossed image and a small piece of fine grade sand paper.
Lightly rub the sand paper over the embossed image, being careful not to tear the paper. This will give the image a rough, grainy look and a nice, white outline.
Tip: If you are using cardstock, you won't see white, but the edges will still look rough and texturized.
To chalk the images, simply rub chalk onto the raised part of the image with an applicator (a cotton swab or a makeup sponge work well) until you've achieved the desired look, and gently shake off extra chalk dust.
Tip: Chalk erasers are a great tool for scrapbookers. Any mistakes you make while chalking can quickly be righted with this handy invention
You decide how you want it to look by choosing the chalk colour and how much you apply. You can trace the inside of the emossed design or you can chalk the whole image.
Tip: Feel free to use different colours on the same design (ie. a flower in a pot: use different colours of chalk to make the flower pink, the stem green, and the pot a terra cotta orange).
In this picture, I chalked the designs with black chalk, shading the whole element in, and then rubbed sandpaper lightly over top, to help the designs stand out.

Both of these techniques call attention to embossed elements which could otherwise go unnoticed.
For more great tips and how-tos, click on the article title. You will be directed to a great dry embossing site with information on how to emboss, what you need to get started, and great ideas to keep your creative juices flowing.
Tuesday, March 07, 2006
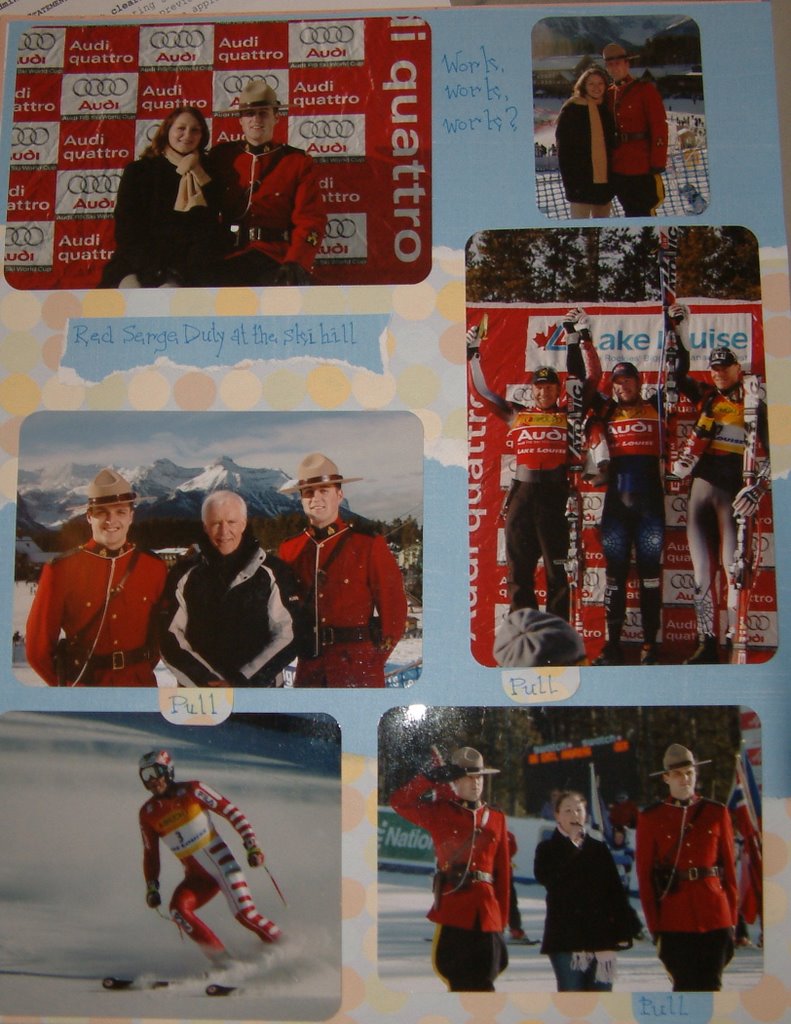
Sneaky Journaling Tips
Journaling is usually the last thing scrapbooker's think about when they're creating their layouts.
When all the pictures are in place and the layout is nearly complete, they think, now where can I add a few words about these pictures??
Well, even if this sounds all to familiar, there are a few tricks to sneak your thoughts onto a page full of pictures.
One of my favourite tricks is to slide your journaling behind photos, leaving a small 'pull tab' revealed.
It's a little hard to see in this picture, but there are three pull tabs on this layout. They slide in easily behind photos and create journaling space where there was previously no room.
This way, you can still squeeze all of those pictures in and write a few words about each one.
One of the greatest benefits about this method is that you can direct your journaling to a specific picture.
You can relay how each face your dog makes reveals his different moods or you can link every different feature on your baby to a family member.
Another tip is to hide a journaling block behind a photo that is fastened with hinges, so you can lift it up to reveal what you've written.
This is a good way to incorporate a lot of journaling into your layout.
Also, if your journaling is sentimental, this is a good way to ensure that not everyone who flips through your scrapbook will read it. People will only see it if they choose to lift the picture.
Try adding an accordion-style journaling book to your layouts.
This way, you can have unlimited journaling, and still have room for other elements.
It also adds dimension and character to your layout.
There's always room to add a bit of journaling.
Every page can accommodate a few written words, and they help keep your memories fresh in your mind, no matter how long it's been.
Monday, March 06, 2006
Tip # 54
Scrapbooking is a great way to be creative with your memories.
Don't let it stop at embellishments. Make sure your photos are changing as well.
• change the sizes of your photos
• make some black and white
• use a coloured filter
• print some matte and some glossy
• print a black and white photo on coloured paper for a retro look
Whatever you can do to make each page look unique, do it. That's what scrapbooking is all about.
Creativity.
Sunday, March 05, 2006
Scrapbooker's Block
Just like writer's block, scrapbookers can sometimes feel as though they've hit a creativity wall.
Your pages start to look alike: two pictures, a journaling block, and an embellishment.
You use the same old colours because your pictures are of the same old things.
You sit down and flip through photos and can't muster the want to start a new page layout.
Happens to the best of us.
One of my best tips is to look for creativity in others.
Use your peers!
Why not?
There are so many websites, magazines, books, web logs, and stores that feature unique and beautiful layouts as well as tips and techniques to get you back on your feet again.
You won't be able to tear yourself away.
If you don't feel you have the time to flip through pages or wander through stores (really???), arrange a scrapbooking day with fellow scrappers.
Have your friends look at your pages and see what they think.
There are so many different techniques and mediums out there, you're bound to be able to swap ideas and gain a fresh perspective.
Plus, it's fun!
If all else fails and you have a few minutes but just feel like the creativity isn't flowing, don't waste a second of it.
Surely, you can still do something.
Not everything about scrapbooking has to be creative 100 per cent of the time.
Gather the photos you have and start cropping.
Find papers or quotes to match your photographs.
Do a quick inventory of all your supplies. You may find a tool you had long forgotten or a specific embellishment that would be perfect for an upcoming project.
Whatever you do, don't give in.
Staring at a blank canvas is definitely not going to inspire you, but these tips just might.
Scrapbooking Hardware
It's amazing where you can find things for your scrapbooks.
There are the usual hot spots. Haunts where you'll find bug-eyed scrappers drooling over a new line of stickers or ogling the newest die-cuts.
Craft stores, scrapbooking stores, paper supply stores: these are the usual stops on a scrapbooker's checklist.
But there are a few options you may be missing out on.
Take your local hardware store for example.
Power tools, lawn fertilizer, and dusty appliances....
Doubting me are you?
Well, it's time to reevaluate those aisles you pass by without a second glance.
There are so many great things hiding in hardware stores.
Surprised?
Use your creativity and take a second look at some of the things you pass by:
• house numbers can be used as hanging elements (they're great for birthday pages and can give a layout a manly feel)
• hinges can be used to fasten pictures, journaling blocks, or flat elements to your page (they're great for making "shutters" which open to reveal a photo or journaling)
• drywall tape is a great way to create lines and give dimension to your page layout (try laying the tape down on a page, applying chalking over top, and then removing the tape for a unique grid pattern)
Not only can you use hardware store finds for embellishment, you can also find some great tools that are perfect for scrapbooking.
• paint brushes
• sponges
• sand paper (use it to give your paper a rough, worn in look)
• stencils
There are so many great finds for scrapbookers everywhere you look, if you just keep your eyes open.
See what you can find.
Happy hunting!
Friday, March 03, 2006
Chalk it up!
There are so many uses for simple childhood tools in scrapbooking. It really is a chance to escape to childhood days of cut and paste.
Chalk is one of the best tools to take with you out of your childhood, and into your scrapbooking supplies.
Cheap, colourful, and malleable, chalk can be used in any number of ways to spice up your layouts.
If your pages are starting to look a little bland, chalk is a great way to make elements stand out.
It's easy to over-coordinate your papers so that elements blend into your page layouts: chalk is the key to achieving seperation.
• Rub some chalk around the edges of smaller elements or the letters in your titles to help them stand out on busy backgrounds.
You can also use chalk to create beautiful, unique page accents.
• By grinding chalk into fine dust and sprinkling it onto a page, you can create a one of a kind splatter design.
This works good for painting pictures or pictures of messy kids, pets, etc.)
• For a great watercolour look, use a soft sponge ( a makeup sponge works great) to blend the spots together.
This look is perfect for sunrise or sunset pictures.
However you choose to use it, chalk is a great addition to every scrapbooker's toolbox.
Thursday, March 02, 2006
Tip # 13
If you have a lot of photos with a lot of background, and a very small subject, use a jumbo square punch to crop the photo down to size.
This saves the hassle of trimming photos with scissors and is an easy way to keep secondary photos the same size (primary photos are the main photo on a layout, secondary are the so-so pics).
These photos can be used together in a photo montage or border or separately to decorate a tag.
This saves the hassle of trimming photos with scissors and is an easy way to keep secondary photos the same size (primary photos are the main photo on a layout, secondary are the so-so pics).
These photos can be used together in a photo montage or border or separately to decorate a tag.
Wednesday, March 01, 2006
Colour themes
We've covered making your photos pop using colours picked from pictures, now we're going to talk about how to link them into a theme.
Most layouts need a strict colour theme to achieve unity and balance.
Without themes, pages look cluttered and seem to have random, mismatched elements.
Basic themes are pastels, primary colours, jewel tones, or monochromatic colours.
By keeping all of the colours you use on each page within the boundaries of one of the above themes, you will be able to mix and match without worry.
Another fail safe idea is to mix in black, grey, or white. These colours can be used along with any of the aforementioned themes with good results. Just make sure that it gives you the look you want.
For more theme ideas, look around you.
Check out packaging in the grocery store. What colours do they use together? Do you like the results?
What colours are 'in' this year? If there's a new mix that you like, test it out on a layout.
Just keep in mind that these are keepsakes that you'll want to keep around for years. If purple and yellow are in this season, and you're not sure if you'll like it next year, hold off.
We take a lot of nature pictures, so most of my pages use blues, browns, and greens.
Play until you find a few themes that you really like, or that go with the colours in most of your pictures.
There are so many colours out there to experiment with, just have fun with it.
Choosing Colours
Choosing colours to use with photos can be tricky.
Some people find it hard to trust their intincts and go with the colours they first think of when looking at a picture.
Ideally, you should learn to trust your gut.
If a purple jacket pops out at you from a picture, frame it with the same shade of purple. It will draw your eye to the picture.
Likewise, if you want a certain element to stand out, you can use this technique to achieve just that.
Think your baby has beautiful blue eyes? Choose a frame or background paper that picks up that blue, and others will notice.
Using colours that intensify your pictures will only make our scrapbooks more eye-catching and keep the focus from straying to elements as opposed to the moments you want to remember.
If you're not sure your instincts are guiding you in the right direction, or if you just need a quick lesson in colour, click the "Choosing Colours" title. It will link you to a page on design arts, complete with colour wheel, so you can learn to choose colours that will work for your pictures.
Better Backgrounds
One of the most often overlooked element of a scrapbook page is the background.
Most people set one piece of paper as their background and start adding elements, without spending anytime on the backdrop for their whole page.
Spend a little time on your backgrounds every once in a while to keep your pages looking fresh and to keep your scrapbook more interesting.
Here are a few ideas to try:
Tear a sheet of paper ( or use a skinny scrap) to use as a border along one edge of your background paper. (top, bottom, left, or right, use them all).
Sew a bunch of jagged scraps together for a pieced look.
Place a slightly smaller paper over top of your background page to create a thin border around your layout. Bonus Tip: Tear the smaller paper's edges for dimensional impact.
Overlap scraps to create a collage look. Bonus Tip: Make sure the patterns aren't all really busy. One dominant pattern is perfect.
Make sure you try to always bring new elements to each of your layouts. It will keep people turning the pages and wanting to see more.
Subscribe to:
Posts (Atom)
